Just what the title says, if you’re looking to program your Gatehouse electronic lock, this article is your go-to resource.
In the next few paragraphs, you’d learn how to change your Gatehouse Electronic lock programming code, create or delete user codes, restore factory settings, and more. Let’s begin!
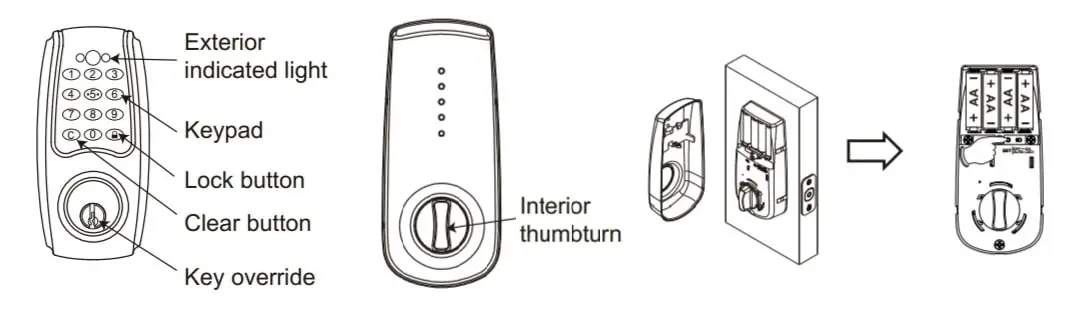
First off, you need to know how the lock’s keypad/button works—and where they are located, as you need them for all settings/programming. So if you’re not familiar with them, see the image below.
How to Change the Programming Code on a Gatehouse Electronic Deadbolt
Table of Contents
Gatehouse Electronic Keypad Deadbolt comes with a preset programming code—123456. This code gives you access to all other settings. That is, you need to enter your programming code to add or delete user codes, reset the lock, etc.
Note: Your programming code is also your master code, which is 123456 (preset). You should change it to a unique code for security purposes.
So here’s how to change your Gatehouse electronic lock programming code:
- Step 1: Press and hold the SET button (for about 2 seconds) until the lock flashes red and beeps twice. The SET button is located on the inside of the interior assembly, so you’ll need to remove the interior cover to access it—see the image above.
- Step 2: Enter your current programming code and then press the Lock button. The default code is 123456—not valid if it was previously changed.
- Step 3: Press 1 and 0 (10) and then press the Lock button. Now enter your new programming code (6 digits) and press the Lock button.
Did the red LED light continuously for 10 seconds or so? If yes, then that’s all about changing the programming/master code on a Gatehouse electronic lock. So your new programming code is now active.
You should, however, test it to see if it works. You may attempt any programming such as adding a user code to see if the new programming code is effective.
How to Add a User Code on Your Gatehouse Electronic Lock
User codes are more or less virtual keys that let you unlock your door without a physical key. The Gatehouse Electronic Deadbolt allows users to program up to 10 user codes, in which case, you can share codes among those you want to give access to your home—when you’re away. The lock accepts 4 to 6-digits user codes.
That said, here’s how to add user codes on your Gatehouse electronic door lock:
- Step 1: Press and hold the SET button until the lock beeps twice and flashes red. This will put the lock in programming mode.
- Step 2: Input your current programming code and then press the Lock button.
- Step 3: Press 2 and 0 (20) and then press the Lock button.
- Step 4: Enter your new user code (4 to 6 digits) and then press the Lock button.
The red LED will light constantly for about 10 seconds and that shows the new code has been added.
How to Delete/Reset User Codes on a Gatehouse Electronic Lock
You can either delete a single user code or delete all—simultaneously. Let’s start with how to delete a single user code:
- Step 1: Press and hold the SET button until the red LED lights and the lock beeps twice.
- Step 2: Input your current programming code and press the Lock button.
- Step 3: Press 3 and 0 (30) and then press the Lock button. Now enter the user code you want to delete and press the Lock button.
That’s all about deleting an existing user. After the last step, the red LED will light for about 10 seconds, indicating the code has been successfully deleted. If it doesn’t, then the process wasn’t successful—repeat from step 1 and ensure you’re doing everything correctly.
Deleting All Existing User Codes at Once
- Step 1: Press and hold the SET button for about 2 seconds. This will trigger the red LED to light—along with two beeps, indicating your lock is in programming mode.
- Step 2: Enter your current programming code and then press the Lock button.
- Step 3: Press 4 and 0 (40) and then press the Lock button.
- Step 4: Press and hold the Clear button (c) for some time—up to 3 seconds (see image above if you’re not sure where the Clear button is located).
This action will turn the green light on, followed by one beep. And then the red LED will light constantly for up to 10 seconds. This shows that all existing user codes have been deleted successfully.
How to Reset a Gatehouse Electronic Lock to Its Factory Settings
- Remove the interior assembly cover to access the batteries.
- Remove one battery and then press and hold the SET button.
- While still holding the SET button, put the battery back. Now release the SET button.
- If the green LED illuminates and the lock beeps twice, then the factory settings have been successfully restored.
Keep in mind, resetting your lock to factory default settings will permanently erase all user codes, programming code, and all other settings. You can use the preset programming code—123456 to reprogram the lock.
You may also read our article about how to reset Trilogy locks and other smart locks.
How to Lock and Unlock a Gatehouse Electronic Lock
- Locking from outside: Ensure your door is properly closed and then press the Lock button to lock the door.
- Locking from inside: Turn the interior thumb turn to a horizontal position to lock the door.
- Unlocking from outside: Enter an existing user code to unlock the door.
- Unlocking from inside: Turn the interior thumb turn to a vertical position to unlock the door.
Note: The lock features a keyway, so you can as well lock and unlock it from outside via a physical key.
Enabling Auto Lock Function
Enabling the auto-lock feature on your Gatehouse lock means it will automatically lock when it’s left unlocked for 10 seconds or so. It works when the door is closed.
That said, here’s how to enable the auto-lock function:
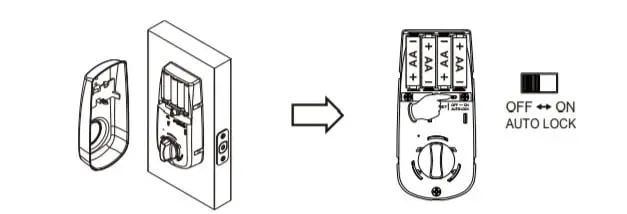
- Locate the auto-lock function on the inside of the lock’s interior assembly. You’ll have to remove the interior assembly cover to access the auto-lock function button. See the image below.
- Switch it to the ‘ON’ position to activate the auto-lock function.
- You can also switch to the ‘OFF’ position to deactivate the auto-lock function.
Gatehouse Electronic Lock Problems and Troubleshooting
Why is my Gatehouse electronic lock flashing yellow?
Frequent yellow flashes show that the lock’s battery is getting low. Replace them with Alkaline batteries and ensure you replace all batteries for the best performance. Do NOT mix old batteries with new ones.
Why can’t I change my Gatehouse lock programming code?
You probably didn’t enter your code within 10 seconds. Ensure you enter your programming code within 10 seconds once you get to the step that requires you to enter a new programming code.
If it still fails, you may have to reset the lock and start all over again.
Why is my red LED light still on after the setting is complete?
Perhaps your SET button is jammed. Check to see if it’s actually jammed and then remove and replace the batteries. That should put the red LED light off.
How do you reprogram a Gatehouse Electronic Deadbolt?
A good way to reprogram a Gatehouse electronic lock is to reset the lock to its factory settings and then start all over again. See how to reset a Gatehouse lock above.
Wrapping Up
So that’s it! As you can see, programming a Gatehouse electronic lock is easy, so long as you know how the keypad works and how to use them.
If you think you may forget your programming code, keep a written copy of it in a safe place. Also, ensure your user codes and programming codes are only disclosed to those you trust.
If you sense any security breach, reset your lock and reprogram all codes.