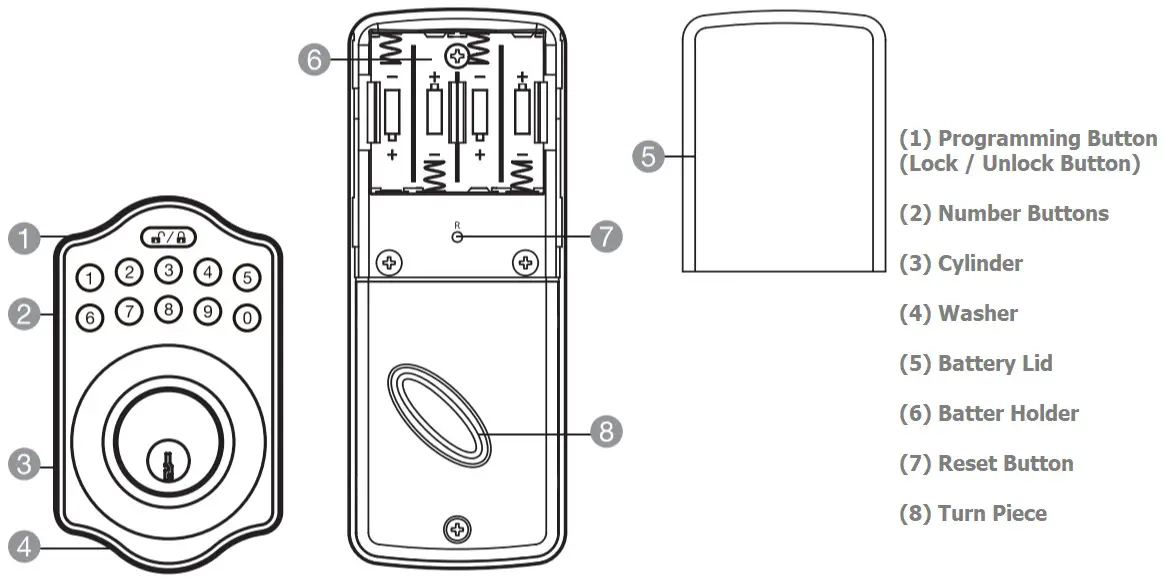
Are you looking to program your new or existing AmazonBasics Electronic Deadbolt but not sure how to go about it? If so, this post is your go-to resource.
In the next paragraphs, I’ll walk you through the steps to program your AmazonBasics electronic lock for reliable operation. Let’s begin!

Note: If you’ve just installed your AmazonBasics Electronic Lock (first-time installation), make sure to first perform the Door Handing Identification before you continue to any other programming. Your lock won’t function electronically without running the door handing detection.
Also, you’ll need to run the door handing identification after performing a factory reset on your lock.
So, here’s how to perform the door handing identification on your AmazonBasics Electronic Deadbolt:
- Enter the default Programming Code (0000) and press the Unlock / Lock button.
- Press 0 and then press the Unlock / Lock button.
That’s how to perform the door handing identification process. Now, let’s head over to the basic programming instructions.
Changing the Programming Code on Your AmazonBasics Electronic Keypad Deadbolt
Table of Contents
This lock comes with a 4-digit Programming Code that allows you to have administrative access to its settings. For instance, if you want to add or delete a User Code, you’ll need to first enter the Programming Code—to put the lock in programming mode.
The default Programming Code is 0000. You should change it to a unique code of your choice for security reasons.
So here’s how to change the existing Programming Code on your AmazonBasics Electronic Deadbolt:
- Enter your current Programming Code and press the Unlock / Lock button (if you’ve never changed the Programming Code, your current Programming Code is the default code—0000).
- Press 4 and then press the Unlock / Lock button.
- Enter a new Programming Code (4 digits) and press the Unlock / Lock button.
The lock will flash green twice, followed by two long beeps, indicating successful programming. So your new Programming Code is now active!
How to Create/Add New User Codes on Your AmazonBasics Electronic Keypad Deadbolt
As you probably know, a User Code for this lock is a 4 to 10-digit code that can be used to unlock the deadbolt through the keypad. The lock allows you to create and save up to 10 User Codes, which can be shared with anyone you want to give access to your home when you’re away.
So, here’s how to create a User Code on your AmazonBasics Electronic Keypad Deadbolt:
- Enter your current Programming Code and press the Unlock / Lock button.
- Press 1 and then press the Unlock / Lock button.
- Enter a new User Code (4 to 10-digit number) and press the Unlock / Lock button to complete the process.
Deleting an Existing User Code on Your AmazonBasics Electronic Keypad Lock
You can either delete a single existing User Code or delete them all at once. Let’s start with how to delete a single User Code:
- Enter your current Programming Code and press the Unlock / Lock button.
- Press 2 and then press the Unlock / Lock button.
- Enter the User Code you want to delete and press the Unlock / Lock button to complete the process.
Note: The lock comes with a default User Code—1234. You should remove it to ensure security—follow the steps above to delete the default User Code.
Deleting All Existing User Codes at Once
As mentioned, you can also delete all User Codes at once, and here’s how to do that:
- Enter your Programming Code and press the Unlock / Lock button.
- Press 3 and then press the Unlock / Lock button.
Note: You can’t unlock/lock your lock via the keypad when all User Codes are deleted. So you’ll need to add new User Codes to enable keypad locking functions. See how to add new User Codes above.
Enable/Disable All User Codes
With this feature, you can temporarily make all User Codes inactive instead of deleting them.
Here’s how to disable all User Codes:
- Enter your current Programming Code and then Unlock / Lock button.
- Press 8 and then press the Unlock / Lock button.
Repeat the same steps to enable all User Codes.
Creating a One-time User Code
As the name implies, a one-time User Code can be used just once. The code automatically expires once it’s used to unlock the lock.
Follow the steps below to create a one-time User Code on your AmazonBasics Electronic Deadbolt:
- Enter your Programming Code and press the Unlock / Unlock button.
- Press 9 and then press the Unlock / Lock button.
- Enter a one-time User Code (4 to 10 digits) and press the Unlock / Lock button.
How to Turn Auto-Lock On/Off
As you probably know, enabling the auto-lock feature will set the lock to automatically lock when it’s not locked for some time. Follow the steps below to turn on Auto-Lock on your AmazonBasics Electronic Deadbolt:
- Enter your Programming Code and press the Unlock / Lock button.
- Press 5 and then press the Unlock / Lock button.
Now auto-lock is enabled on your lock, so it will automatically lock after 30 seconds—when you leave it unlocked.
Repeat the same steps to turn off the auto-lock function.
Note: 30 seconds is the default delay time. You can change it to your preferred time. See how to do this below.
How to Set Auto-Lock Time Delay
- Enter your current Programming Code and press the Unlock / Lock button.
- Press 6 and then press the Unlock / Lock button.
- Enter your preferred time delay (10-99 seconds) and press the Unlock / Lock button.
Factory Resetting Your AmazonBasics Electronic Keypad Deadbolt
Follow the steps below to reset your lock:
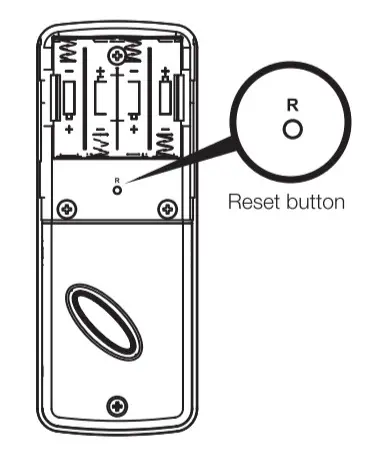
- Remove the battery cover to locate the Reset button (see the image below).
- Press the Reset button for over 5 seconds.
- If you hear 3 long beeps, it means the lock is reset. Ensure you perform the door handing identification process before programming any other functions.

Note: All your custom programming will be erased after performing a factory reset. So you’ll have to start all over again to program the lock, just as you did when you first installed it.
AmazonBasics Electronic Deadbolt Troubleshooting
In this section, we look at some common problems you may have with your AmazonBasics Electronic Deadbolt and how to troubleshoot them.
Why is my AmazonBasics Electronic Lock not working correctly after installation?
If after installing the lockset and batteries, the lock refuses to lock and 3 short beeps are emitted when you press the Programming button, then chances are the door handing identification process is incomplete.
To fix this issue, perform the door handing identification process again and ensure you follow the steps correctly. See how to do that in the third paragraph of this post.
Why is my lock not responding after installing batteries?
Check to see if the batteries are installed correctly. If not, reinstall the batteries correctly and ensure the cable is properly connected. More so, ensure you use the right batteries—4 AA 1.5V alkaline batteries.
The latch bolt suddenly locks up and the inside turn-piece can’t be rotated, not even with a key; what to do?
The deadbolt latch could be stuck because of a misaligned or warped door. To fix this issue, remove one battery from the lock and press any button on the keypad for electric discharge. Next, put the battery back in. The latch will re-detect its position automatically.
If the latch frequently gets stuck, check and fix the deadbolt and strike alignment.
The lock won’t unlock when I enter a User Code and press the Programming button; what to do?
Use a physical key to unlock the door and then try to unlock with a User Code again. If the problem persists, contact Customer Support at 1-866-216-1072.
Wrapping Up
So that’s how to program/reprogram your AmazonBasics Electronic Keypad Deadbolt. And for troubleshooting, restoring factory settings may help fix several issues you’re having with the lock.
You may also like to read our articles on how to program Gatehouse, Brinks, and Honeywell Electronic Keypad Deadbolts.