In this post, I’ll walk you through the steps to program your new/existing Honeywell Digital Deadbolt. If that sounds like what you’re looking for, then let’s head right into it!
But before we head over to the programming instructions for your Honeywell Digital Deadbolt, see the image below if you’re not familiar with the keypad/button functions.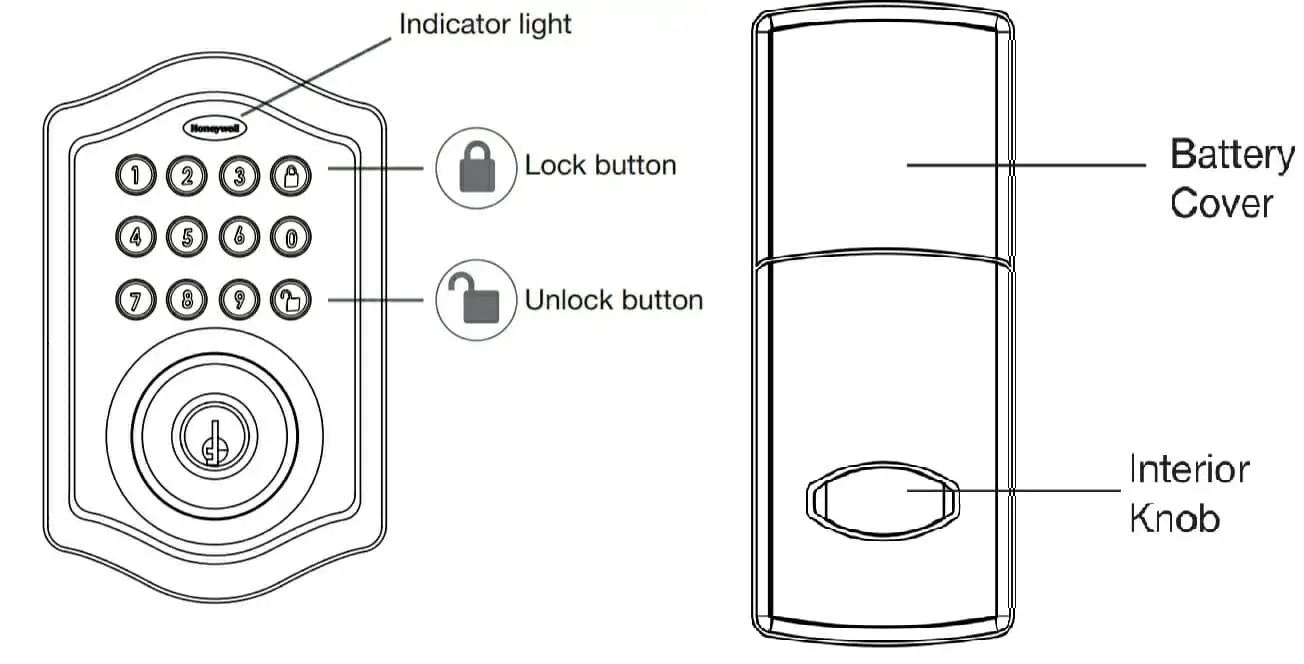
Changing the Programming Code on a Honeywell Digital Deadbolt
Table of Contents
Like other electronic door locks, Honeywell Electronic Deadbolt comes with a 6-digit default Programming Code that allows you to make changes to your lock programming. For example, if you’re looking to add new User Codes to your lock, you’ll need to first enter your Programming Code.
The default Programming Code is 123456. However, this is a factory default code, meaning other Honeywell deadbolts have the same code, so you’ll need to change it to ensure security.
So here’s how to change the Programming Code on your Honeywell Digital Deadbolt:
- Step 1: Enter the default/current Programming Code and press the Unlock button. (For a new lock, use the default Programming Code—123456. But if you previously changed the Programming Code, use the current code).
- Step 2: Press 4 and then press the Unlock button.
- Step 3: Enter a new Programming Code (6 digits) and then press the Unlock button. Next re-enter the new Programming Code and press the Unlock button.
You’ll hear one beep, followed by a green light from the light indicator—that shows the Programming Code has been successfully changed.
You may also read our article about changing the Master Code on Defiant and Brinks electronic locks.
Adding New User Codes to a Honeywell Digital Deadbolt
As you probably know, User Codes are used to unlock the lock/door and you can create up to 50 User Codes on your Honeywell Digital Deadbolt. Each User Code must be 4 to 8 digits.
More so, this lock requires that you link each User Code to a unique User ID (any number between 01 to 50) for easy identification.
That said, here’s how to Add a User Code to a Honeywell Digital Deadbolt:
- Step 1: Enter your current Programming Code and press the Unlock button.
- Step 2: Press 1. Next press the Unlock button and then enter a unique User ID—any number between 01 to 50. (Note that this is not the User Code but a User ID to be linked to a User Code).
- Step 3: Press the Unlock button and then enter your new User Code—4 to 8 digits.
- Step 4: Press the Unlock button and re-enter the new User Code.
- Step 5: Now press the Unlock button to complete the process.
The lock will beep and illuminate green via the light indicator, confirming that a new User Code has been successfully added.
Deleting/Removing an Existing User Code on a Honeywell Digital Deadbolt
Here’s how to delete an existing User Code on your Honeywell electronic lock:
- Enter your Programming Code and press the Unlock button. Next press 2 and then press the Unlock button.
- Enter the User ID linked to the User Code you want to delete and then press the Unlock button.
- Re-enter the User ID linked to the User Code to be deleted and then press the Unlock button.
Now the Code has been deleted. You should hear one beep followed by a green light from the light indicator—confirming that the process was successfully deleted.
Deleting All User Codes at Once
To delete all programmed User Codes on your Honeywell Digital Lock, here are the steps to follow:
- Enter your current Programming Code and then press the Unlock button.
- Press 3 and then press the Unlock button.
- Enter your Programming Code again and then press the Unlock button to complete the process.
And that’s all about deleting all the existing User Codes on a Honeywell Digital Deadbolt.
Automatic Lock Function
This feature automatically locks your door when it’s left unlocked for a specified time. However, the feature is usually disabled by default and you’ll need to enable it if you want to keep it active.
Here’s how to enable the automatic lock function on a Honeywell Digital Lock:
- Enter your current Programming Code and press the Unlock button.
- Press 5 and then press the Unlock button.
- Enter your preferred Time-Delay (20 to 900 seconds) and then press the Unlock button.
Now the auto-lock feature is active! It should automatically lock the lock/door—based on the specified time delay.
To cancel auto-lock, repeat the same steps above but set the time delay to 00.
How to Turn off the Sound on Your Honeywell Digital Deadbolt
If you’re not comfortable with the sound from your lock when operating it, you can simply turn it off. Here’s how to do that:
- Enter your Programming Code and press the Unlock button.
- Press 6 and then press the Unlock button.
- Press 2 and then press the Unlock button to turn off the sound.
To turn on sound, repeat steps 1 and 2 above and then press 1 followed by the Unlock button for the last step.
Factory Resetting a Honeywell Digital Deadbolt
Here’s how to reset a Honeywell Digital Deadbolt to the original factory settings:
- Remove the battery cover. (See the image above if you’re not sure where the battery cover is located)
- Remove one battery and wait 10 seconds.
- Put the battery back and wait until you hear a long and short beep.
- Within 3 seconds, press the Unlock button 3 times. The lock will beep and illuminate green via the light indicator, indicating that the process was successful.
Now your lock is reset and you’ll have to reprogram it using the default Programming Code.
Note: Restoring factory settings will automatically remove all User Codes, including the Programming Code, and other changes you made.
Also, see how to restore factory settings on a Gatehouse electronic lock.
Honeywell Digital Deadbolt Troubleshooting
In this section, we look at some common Honeywell Digital problems and how to fix them.
Why is my Honeywell Digital Deadbolt not working electronically?
Your lock may stop working electronically if the batteries are low or not properly positioned. So check that the batteries are still active and properly placed. Also, check if the control wire is attached to the interior assembly.
For low batteries, replace them with non-rechargeable alkaline batteries.
Why is my lock giving an error signal when opening or locking, and the Deadbolt Latch won’t extend or retract fully when the door is closed?
Here are troubleshooting steps to try:
- Use the physical key or interior knob to unlock the door.
- Open the door, and check that the latch operates correctly.
- Check that the strike plate alignment is still intact, otherwise, adjust it to ensure there’s no binding against the Deadbolt Latch.
This should fix the problem.
Why is my Deadbolt sticking?
This could happen if the installation screws of your lock are too tight. To fix it: remove the interior assembly, loosen the mounting plate screws slightly, lock and unlock the lock with a physical key and then reattach the control wire and interior assembly.